
The smell of cinnamon and baked apples wafting through the house on a cool autumn evening… it just screams Texas fall to me. This apple crisp recipe is one I’ve been tweaking for years, ever since my oldest, little Lily, declared the store-bought kind “too mushy.” So, I took it upon myself to create something better. This recipe is kid-approved, mom-approved (that’s me!), and has been made countless times in my own kitchen. I promise you a warm, comforting dessert that’s easy to throw together and will have everyone asking for seconds.
Why This Recipe Works
Let’s be honest, as a busy mom of two, I need recipes that are quick, easy, and don’t require a million ingredients. This apple crisp fits the bill perfectly! Here’s why it works:
- It’s fast: From start to finish, you’re looking at under an hour.
- Kid-friendly: Even my picky eaters love it! The sweet apples and crunchy topping are a winning combination.
- Make-ahead potential: You can prep the apples and topping in advance, making it even easier on busy weeknights.
- Simple Ingredients: Nothing fancy here! Just pantry staples and fresh apples.
Ingredients
- 6 medium apples (such as Granny Smith, Honeycrisp, or Gala), peeled, cored, and sliced
- 1/2 cup granulated sugar
- 2 tablespoons all-purpose flour
- 1 teaspoon ground cinnamon
- 1/4 teaspoon ground nutmeg
- 1 tablespoon lemon juice
Ingredient Notes
Apples: The type of apple really matters here! I like to use a mix of tart and sweet apples for the best flavor. Granny Smith apples provide a nice tartness, while Honeycrisp or Gala add sweetness. Feel free to experiment with your favorites.
Flour: A little flour helps to thicken the apple juices and prevent the crisp from becoming too watery. You can substitute with cornstarch for a gluten-free option.
Spices: Cinnamon and nutmeg are classic apple pie spices, but feel free to add a pinch of ground cloves or allspice for a little extra warmth.
Lemon Juice: A little lemon juice brightens up the flavor and helps to prevent the apples from browning.
For the Crisp Topping:
- 1 cup all-purpose flour
- 1 cup rolled oats
- 1 cup packed brown sugar
- 1/2 teaspoon baking powder
- 1/4 teaspoon salt
- 1/2 cup (1 stick) cold unsalted butter, cut into cubes
Oats: Rolled oats give the topping a nice, chewy texture. Quick oats will also work in a pinch, but the texture won’t be quite the same.
Brown Sugar: Brown sugar adds moisture and a rich, caramel-like flavor to the topping. You can use light or dark brown sugar, depending on your preference.
Butter: Cold butter is key to creating a crumbly topping. Make sure your butter is cold and cut into small cubes before adding it to the dry ingredients.
Step-by-Step Instructions
Step 1: Prepare the Apples.
Peel, core, and slice your apples. I like to slice them about 1/4 inch thick. In a large bowl, toss the sliced apples with the granulated sugar, flour, cinnamon, nutmeg, and lemon juice. Make sure the apples are evenly coated with the spices and sugar. The lemon juice will help prevent the apples from browning while you prepare the topping.
Step 2: Make the Crisp Topping.
In a separate bowl, whisk together the flour, oats, brown sugar, baking powder, and salt. Add the cold, cubed butter to the dry ingredients. Using a pastry blender or your fingertips, cut the butter into the dry ingredients until the mixture resembles coarse crumbs. You want to see small pieces of butter throughout the mixture – this is what creates the crumbly texture.
Step 3: Assemble the Crisp.
Pour the apple mixture into a greased 9×13 inch baking dish. Sprinkle the crisp topping evenly over the apples, making sure to cover the entire surface. Don’t worry if the topping looks a little thick – it will bake down as the apples release their juices.
Step 4: Bake.
Bake in a preheated oven at 375°F (190°C) for 30-40 minutes, or until the topping is golden brown and the apples are tender. You should see the apple juices bubbling around the edges of the dish. If the topping starts to brown too quickly, you can tent the dish with foil for the last 10-15 minutes of baking.
Step 5: Cool and Serve.
Let the apple crisp cool slightly before serving. This will allow the juices to thicken up a bit. Serve warm, plain or with a scoop of vanilla ice cream or a dollop of whipped cream. A sprinkle of cinnamon or a drizzle of caramel sauce is also a nice touch. Enjoy!
Expert Tips from My Kitchen
- Don’t overmix the topping: Overmixing will develop the gluten in the flour, resulting in a tough topping. Mix just until the butter is incorporated and the mixture resembles coarse crumbs.
- Use cold butter: Cold butter is essential for creating a crumbly topping. If the butter is too soft, it will melt into the dry ingredients and create a greasy topping.
- Adjust the sweetness: If you prefer a sweeter crisp, add an extra 1/4 cup of sugar to the apple mixture or topping.
- Add nuts: For a little extra crunch and flavor, add 1/2 cup of chopped pecans or walnuts to the topping.
- Make it kid-friendly: Let the kids help with peeling and slicing the apples (with supervision, of course!) or mixing the topping.
- Reheat leftovers: Reheat leftover apple crisp in the oven at 350°F (175°C) for 10-15 minutes, or until warmed through. You can also microwave individual portions for a quick and easy dessert.
- Prevent burning: If your topping is browning too quickly, cover the crisp loosely with aluminum foil during the last 15 minutes of baking.
Storage & Meal Prep
Storage: Store leftover apple crisp in an airtight container in the refrigerator for up to 3 days.
Reheating: Reheat apple crisp in the oven at 350°F (175°C) for 10-15 minutes, or until warmed through. You can also microwave individual portions for a quick and easy dessert, but the topping may not be as crispy.
Make-Ahead: You can prepare the apple mixture and the crisp topping separately up to 24 hours in advance. Store the apple mixture in the refrigerator. Store the topping in an airtight container at room temperature. When ready to bake, assemble the crisp as directed.
Freezing: While I prefer this fresh, you can freeze baked apple crisp for up to 2 months. Let it cool completely, then wrap tightly in plastic wrap and aluminum foil. Thaw overnight in the refrigerator before reheating.
Substitutions & Variations
Gluten-Free: Use a gluten-free all-purpose flour blend in both the apple mixture and the topping. Make sure your oats are certified gluten-free, as some oats can be cross-contaminated with wheat during processing.
Dairy-Free: Use a dairy-free butter alternative in the topping. I’ve had good results with coconut oil-based butter alternatives. Serve with dairy-free ice cream or whipped cream.
Other Fruits: You can substitute other fruits for the apples, such as peaches, pears, or berries. Adjust the amount of sugar as needed, depending on the sweetness of the fruit.
Spice it Up: Add a pinch of cayenne pepper to the apple mixture for a little kick.
Maple Pecan Crisp: Substitute maple syrup for the brown sugar in the topping and add 1/2 cup of chopped pecans.
Frequently Asked Questions
Can I use different types of apples?
Absolutely! I recommend using a mix of tart and sweet apples for the best flavor. Granny Smith, Honeycrisp, Gala, and Fuji apples all work well. Feel free to experiment with your favorites!
Can I make this ahead of time?
Yes! You can prepare the apple mixture and the crisp topping separately up to 24 hours in advance. Store the apple mixture in the refrigerator and the topping in an airtight container at room temperature. Assemble and bake when ready.
How do I know when the apple crisp is done?
The apple crisp is done when the topping is golden brown and the apples are tender. You should also see the apple juices bubbling around the edges of the dish. A toothpick inserted into the apples should come out easily.
Can I add nuts to the topping?
Yes! Adding nuts is a great way to add extra crunch and flavor to the topping. I recommend using chopped pecans or walnuts. Add about 1/2 cup of chopped nuts to the dry ingredients when making the topping.
Is this recipe kid-friendly?
Definitely! My kids love this apple crisp. You can even let them help with peeling and slicing the apples (with supervision, of course!) or mixing the topping.
Can I freeze apple crisp?
Yes, you can freeze baked apple crisp for up to 2 months. Let it cool completely, then wrap tightly in plastic wrap and aluminum foil. Thaw overnight in the refrigerator before reheating.
What can I serve with apple crisp?
Apple crisp is delicious on its own, but it’s even better with a scoop of vanilla ice cream or a dollop of whipped cream. A sprinkle of cinnamon or a drizzle of caramel sauce is also a nice touch.
This apple crisp isn’t just a recipe; it’s a memory in the making. It’s the kind of dessert that brings families together, fills the house with a comforting aroma, and leaves everyone feeling warm and satisfied. It’s a little bit of Texas sunshine baked into a dish, perfect for those cool autumn evenings or any time you crave a little comfort. So, go ahead, gather your family, grab some apples, and give this recipe a try. I can’t wait to hear what you think! And if you loved this recipe, be sure to check out my other family-friendly recipes at FamiliesRecipes.com. Don’t forget to sign up for my newsletter for even more deliciousness delivered straight to your inbox. Happy baking, y’all!
PrintApple Crisp Recipe
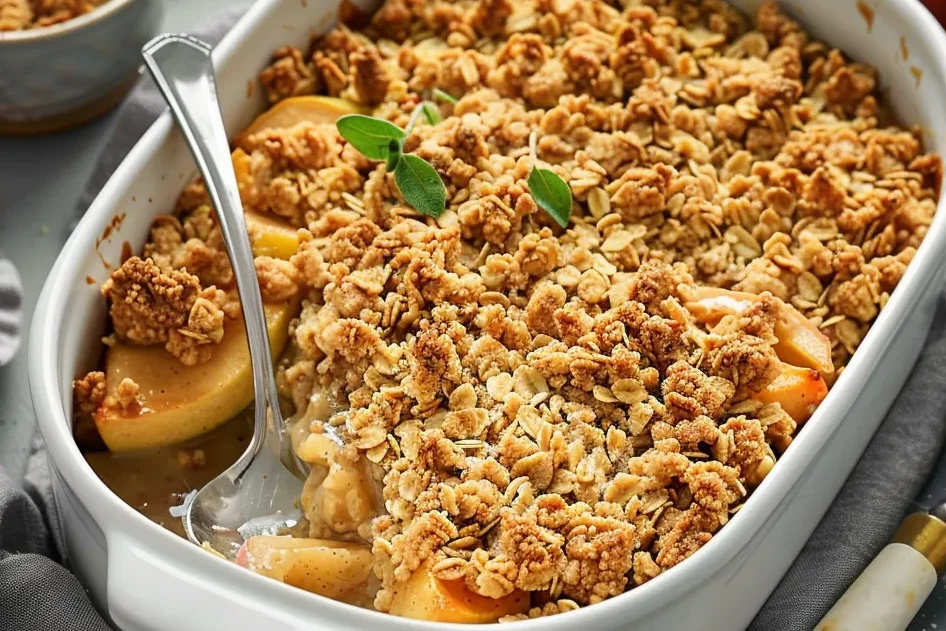
Bake the best Apple Crisp This familyapproved recipe tested in my Texas kitchen is pure comfort food and so easy to make My kids love this Get the recipe
- Prep Time: 15 minutes
- Cook Time: 40 minutes
- Total Time: 55 minutes
- Yield: 9 servings
- Category: Dessert
- Cuisine: American
Ingredients
- 6 medium apples (such as Granny Smith, Honeycrisp, or Gala), peeled, cored, and sliced
- 1/2 cup granulated sugar
- 2 tablespoons all-purpose flour
- 1 teaspoon ground cinnamon
- 1/4 teaspoon ground nutmeg
- 1 tablespoon lemon juice
- 1 cup all-purpose flour
- 1 cup rolled oats
- 1 cup packed brown sugar
- 1/2 teaspoon baking powder
- 1/4 teaspoon salt
- 1/2 cup (1 stick) cold unsalted butter, cut into cubes
Instructions
- Peel, core, and slice your apples about 1/4 inch thick. In a large bowl, toss the sliced apples with the granulated sugar, flour, cinnamon, nutmeg, and lemon juice. Make sure the apples are evenly coated with the spices and sugar.
- In a separate bowl, whisk together the flour, oats, brown sugar, baking powder, and salt. Add the cold, cubed butter to the dry ingredients. Using a pastry blender or your fingertips, cut the butter into the dry ingredients until the mixture resembles coarse crumbs.
- Pour the apple mixture into a greased 9×13 inch baking dish. Sprinkle the crisp topping evenly over the apples.
- Bake in a preheated oven at 375°F (190°C) for 30-40 minutes, or until the topping is golden brown and the apples are tender.
- Let the apple crisp cool slightly before serving. Serve warm, plain or with a scoop of vanilla ice cream or a dollop of whipped cream.
